The Papago Wall and Slide is, according to many, the most demanding section of the Escalante Route, Grand Canyon. Preparing my hike I consulted many trail reports and video’s online, but most of the descriptions I found were at least partly mistaken. This is my attempt at a guide to the Papago Wall and Slide.
The Papago Wall and Slide
Trail: Escalante Route, Grand Canyon National Park
Location: Between 75 Mile Canyon and Hance Rapids
Distance: 0.25 miles (400 m)
Elevation gain: 236 ft (72 m)
Elevation loss: 197 ft (60 m)
Difficulty Level: T3 (Demanding, SAC classification)Time: 30 to 60 minutes
= = Update may 2025 = =
Due to a rockslide in October 2024 the ‘Slide’-section is more difficult at the present day than described below. From the information that I have, my description below is still valid. But especially at the top, as you traverse under the wall, the rocks are quite unstable. Please read the comments below from people who have hiked this trail more recently, before deciding to hike the Escalante Route. Be careful!
What are the Papago Wall and Slide?
Near the end of the Escalante Route in the Grand Canyon, about 12 miles from Tanner Beach, lies the infamous Papago Wall. The wall is about one hour hiking downstream from the 75 Mile Canyon mouth at Neville Rapids. At Papago Beach the trail is literally blocked by a giant Vishnu Schist rock that extends into the river. It is impossible to get around the rock through the water. The only way to continue the route is to climb and descend this huge barrier.

Escalante Route: Papago Wall and Slide. Note that the recorded trail (in red) differs from the trail drawn into the digital map (grey dashed line) in the Slide-section.
Before arriving at Papago Beach there is an abrupt descent from the higher trail above the Colorado River. Do not underestimate this descent – I found it almost as difficult as the Slide that came later.
Experienced mountain climbers will probably laugh at this Wall and Slide thing. But this blog is not meant for mountain climbers, but for hikers. As a hiker I enjoy walking long trails, and not climbing walls. And when I was preparing for the Escalante Route, this section of the hike worried me. Especially because it was very hard to find detailed information – and much of what I found was incomplete, partly mistaken or contradictory. So in this post I have compiled a guide based on all the information that I found and was confirmed in reality.
How much time does it take?
Depending on your abilities and physical condition the entire Wall and Slide will take about 30 tot 60 minutes. An avid mountaineer will probably rush through within 15 minutes, while someone with fear of heights and less training in difficult terrain might scramble for 2 hours. Remember this is not a race – I did it in 1 hour (including a short break) and enjoyed every minute of it.
Papago Wall Overview
When you hike the high trail above the Colorado River, coming from 75 Mile Canyon, you’ll get a good view of the Papago Wall. The entire route from the beach to the Papago Top (where the Slide begins) is clearly visible.
As you can see below, the actual ‘Wall’ is just a small part at the beginning, about 30 ft (10 m) high. From a distance this wall might look slick, but once you stand in front of it, you will see that it actually has a whole series of ledges that enable a relatively easy ascent to the top of the wall.

Overview of the Papago Wall ascent
Contrary to some hiker’s advice, I believe you do not need ropes to haul your pack to the top, as long as you take these precautions:
- Pack your (folded) hiking poles tightly in your backpack,
- make sure the heavy items in your pack are low and close to your body,
- loose weight by emptying water bottles, leaving half a liter – you’ll be at the river again soon.
I climbed the wall with about 30 pounds (14 kg) on my back without any problems.
Papago Ledges Ascent
From the beach, step onto the large dark rock slab and approach the wall on the left side. You will probably notice that the dark patina is worn off of the rock, leaving a brown-yellow trace of those who went before you.
For your orientation, look for an outcrop that looks like Kermit the Frog’s face (or maybe I just have too much imagination). This will be your guide on the way up. Just follow the ledges that actually resemble a stone staircase. After about 3 or 4 big steps up, you will be close to Kermit and you will see a narrow chimney above you. Although I have seen many hikers on video trying to push themselves up the chimney – the best way is to go to the left at this point (ignore cairns on top of the chimney).

The Ledges Route on the Papago Wall
Take a good look to the left to find the ledges that will take you sideways and up to the wall top. Also look for cairns on the top to your left. Remember to go slowly. Even then you will probably be at the top of the wall within a few minutes.
Ascent to the Papago Top
Once at the top, carefully walk in downstream direction along the edge of the wall you just climbed. After a few yards, go left at the big black boulders. There will be many cairns showing the way. Just keep in mind that you have to go downstream and up to the ridge above you.

Follow cairns to the protruding cliff with the Tight Squeeze
The Tight Squeeze
The second climb at Papago is the scramble towards what is called the ‘Tight Squeeze’, a narrow opening between protruding rocks at the ridge, leading to a flat trail above it. There is actually a more or less visible trail all the way up, and many cairns will help as well. Just walk towards the ridge and keep close to the wall.
Soon you will reach the Squeeze on your left hand where you will have to slip through and clamber up (± 1 yard / 1 m.). The opening is so tight, that you will indeed have to squeeze yourself through. My backpack was about 20 inch (50 cm) wide, and using my hands and some force, I could just slip through. A very big person might have some difficulties here. In that case, take off your backpack, it’s not difficult to shove it up the ridge from below.

Entrance to the Tight Squeeze marked by a large cairn
Popping up from the Squeeze, you have arrived at a flat and straight trail that leads towards the Papago Top. The views from the ridge towards Red Canyon and Hance Rapids are amazing, but looking down is optional: this is a rather exposed section.
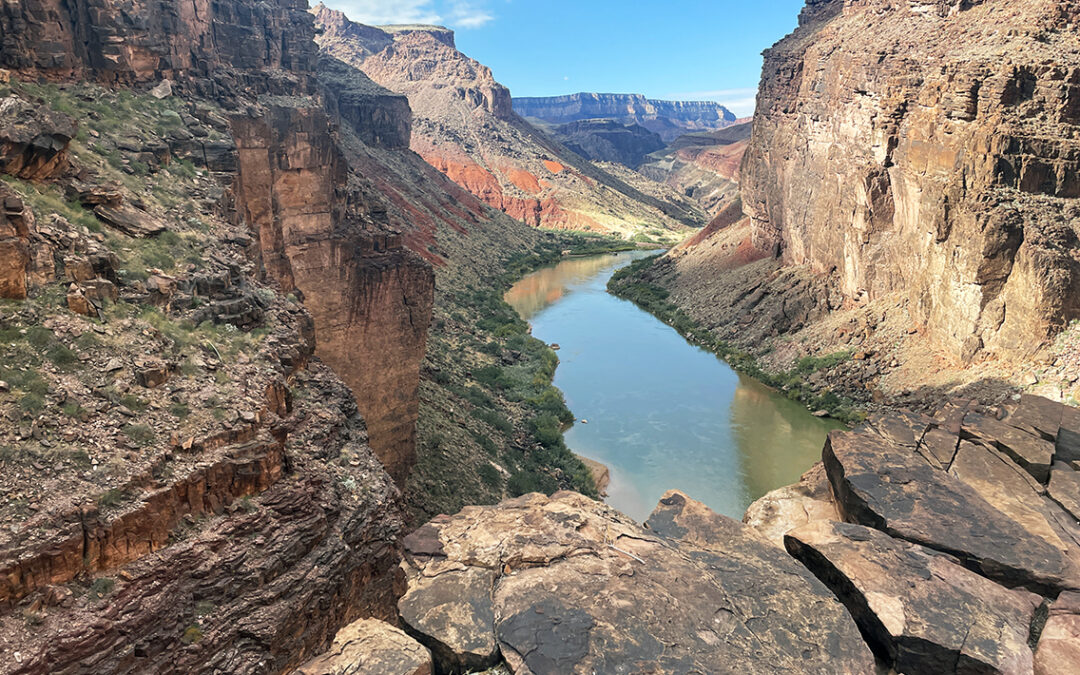
The Papago Slide
The Papago Top marks the start of the Papago Slide, also knows as the Papago Chute. From the top there are even more dramatic views of the Colorado River flowing towards Hance Rapids. The top is highly exposed: the cliff on the river side plunges vertically 230 ft (70 m) into the river. Before heading on, stand still and take some time to study the chaotic mass of scree and boulders before you. You will notice there is a visible trail on the middle part of the chute. In preparation I named various boulders and other distinctive features to make myself familiar with the route – see the picture below.
For your safety:
- For this section I would recommend using trekking poles.
- When hiking in a group: either stay very close or go one by one to avoid rockfall on the ones below you.

The safe route down the Papago Slide
The Grassy Knoll
The crucial thing at the Papago Slide is to cross the chute to the other side before descending. This means first going left. Make sure you do not go down into the chute on the right, directly near the Papago Top. Many have tried this, leaving a suggestion of a trail. But this is not the right way. Go left a few yards until you see The Roof and the White Slab on your right hand. Then go right and follow the rocks and slabs to the other side (not descending yet), until you see the Grassy Knoll close below you. Turn right and go down, probably sliding on your butt, towards the grass.
The Fire Pit
Now you’re on the ‘trail’ part of the slide. Descend on the loose gravel, towards the Half Moon rock, where you’ll bend to the right to the Fire Pit. At this point you will have to either scramble, slide or jump into the Chimney: the steep gravel shaft below the Elephant (this part is not visible on the photo, hidden behind the ravine’s edge).

Almost there: below the Chimney at the end of Papago Slide
The Chimney
Once you’re down in the Chimney, you can use the side of the Elephant for handholds, which you will need because this shaft is extremely steep and consists of pure loose gravel. Trekking poles will also be helpful to negotiate this section. Slowly the route will get easier with every step. The view of the Colorado River will brighten your spirits as you approach the grassy riverside. Look for cairns to get close to the river (there is a higher trail visible, but the low trail is easier to find) and follow the rest of the Escalante Route on the easy and sandy trail to Hance Rapids.
If you have questions about this route, or if you have corrections – please leave a comment below.
> Read the complete trip report: Escalante Route, Grand Canyon
I did this in May of 2025 after the landslide and found the Papago Slide doable (just be sure to walk far across at the top before starting down) albeit a bit unnerving. Candidly the wall and tight squeeze were more intimidating for me. Carrying a pack and scaling a wall without a lot of margin for error was a bit sketchy. I’m sure for a lot of folks it’s nothing, but made for a tense hour up and down Papago. To echo others, these instructions were a huge help though! Thank you!
I did the hike in 2 nights and 3 days, don’t miss the water at Hance Creek- it’s fairly small and not apparent when to get off the trail.
Overall it’s a spectacular route.
Thanks Kurt! Thanks for the update.
Wow! Nicely done. I have a permit for late March that includes the Escalante Route. I’m an experienced GC backpacker; I’m stressing about this section, but less after I read this post (Harmen Hoek references this). Thank you!
Have a great time, Phillip!
I’ve done this route the past three Januarys and I can report that as of 2026 the slide is much safer than it was in 2025. Though steeper and less cairned than it was before the rockslide, it no longer feels grossly unstable, and there’s now a visible trail all the way to the bottom. Even so, follow Pieter’s advice and make a plan at the top, use at least one trekking pole, and stay close to wall on the left once you near the bottom.
One thing to note is that the trail between the wall and the slide has gotten more challenging in recent years thanks to misleading trails and cairns. The correct trail goes straight up to the left, closer to the canyon wall than to the cliff edge. The more-prominently-cairned trail (as of last week) leads to the wrong tight squeeze. If there’s no way both you and your pack can fit and if getting through would require more than 2-3 steps and/or actual climbing, go back down and find the other trail. As you squeeze through your back should be to the river; the wrong squeeze is parallel to the trail.
Fantastic hike!
Thank you Rose for your update and additional information.
Just hiked this Nov. 29, 2025. Lovely hike! Thanks for all your work here! Came in very handy. There is a change to the route down the Slide. If I new how to post a picture, I could detail the change on your route above. You can no longer enter the “butt slide” directly, but before you get to it, the trail steps down and goes back hard to the right for 20 ft or so above that next row of large rocks before you start down the steep section. Then you angle back to the left toward the grassy knoll, joining your marked line near the bottom of the butt slide.
Thanks Richard for your update! This will be helpful for other hikers.
We just did this section on 11/27/25.
I am working on getting over a bad fear of heights, and this description was incredibly helpful. Not only was I able to accomplish this section, but I truly enjoyed it. Thank you for taking the time to document & post this information! It made a huge difference for my experience ☺️
Thank you, Victoria, I’m glad you enjoyed this beautiful hike.
Good sir, thank you for this well written, enjoyable, and certainly information rich account and guide to the Escalante route. I did the route with two friends in 1993 in early October. We came down the Kaibab, and at the Tipoff headed east on the Tonto Trail for a few days until arriving at Horseshoe Mesa. We had a cache of food and assorted items halfway up the Grandview Trail waiting for us which we had placed the week before. Using the area as a layover, we camped two nights on Horseshoe while we rested, drank from the spring, and then on our way off the Mesa to the river heading eastbound, we investigated the old mining shaft and were surprised to see a mining car on the track within the old mine. Mining relics littered the immediate area. We encountered the climb up out of the beach at Neville’s Rapid which I see here is referred to as the Papago wall. 30+ years ago when I did it I was using the Sierra guide, a pocket sized guide to hiking Grand Canyon and the author John Annerino was unaware of or did not share the terminology of the Papago wall. Instead he referred to it as something to the effect of a class three to class four scramble to the top and similar class scramble to the river below. I remember finding it thrilling and exciting but not particularly difficult… Just a little spicy. I could be mistaken but I think it was at the top of the climb of the Papago wall where we were able to look very clearly across the river at the PrePuebloan (Anasazi) ruins on Furnace Flats. I also remember viewing what seem to be about a 20 or 30 foot water scoured and polished drop at the bottom of Papago Canyon which disallowed me from hiking up that side Canyon more than a few steps before encountering the pour off, which was at the time dry. The hike down from the wall (The Slide) was not problematic and the walking along Colorado eastbound to Tanner Rapids and beach was easy and pleasant. At no time during the Papago wall or slide did we feel the need to remove packs, pass packs, or lower with a cord . We just went slowly and kept a large distance between each of us in the event someone were to in advertently cause a rock or rocks to fall. My small group of three total finished up by hiking halfway up the tanner trail and camping at a lovely spot just above the Redwall. The following day we hiked out and easily hitchhiked a ride back to our vehicle at the Grand Canyon Village.
I would like to add a couple of things to consider if you are planning a hike and are working in an extra day or days along this route. The hike up Red Canyon is lovely and well worth a side trip of one to two hours depending on how far you choose to hike up… About 45 minutes up from the river I encountered very good water, from Springs, which was far more palatable than the muddy Colorado laden with silt. The sandy beach at the bottom of red Canyon adjacent to the terminus of the New Hance Trail is very nice for a layover before tackling the climb up and out of the canyon via Horseshoe Mesa and the Grandview Trail. And even though horseshoe does see a little bit of traffic in the form of day hikers as well as overnighters, it is also a very decent spot for an overnight or a layover overnight, with very good springs nearby, the mining history and relics I spoke of above, and for those wanting just a little bit more inner canyon hiking before arriving out at the land above the rim, there is a very nice circumnavigation of horseshoe Mesa itself, not positive of the mileage off hand but I believe approximately three relatively easy miles particularly with pack dropped and left behind for this quick jaunt.
Thank you again good sir. Your description of the route and the additional information that you provide in the comment section would seem to be quite invaluable for anybody considering or planning for, or in my case looking back over, a wonderful hike on the Escalante Route. Thank you again!
Thank you Christopher, for your extensive and enthusiastic account of your hike.
Hi Pieter. My wife and I just completed the route in 4 days, 3 nights. It was spectacular. Thank you for the guide to the wall and slide. The wall was quite easy. We passed our packs up as we climbed. The slide on the other hand was extremely risky, especially at the top as you traverse under the wall. There is absolutely nothing stable on the slide. I was a bit more comfortable than my wife, but I too was extremely uncomfortable with the risk. Lowering the packs with rope would have made movement on the slide a bit better as it was quite difficult with them. This is our third backcountry trip in the canyon including the Boucher trail for reference. Unfortunately, I will never do this wonderful route again because of the risk of the slide. Sad because this is a magnificent route otherwise.
Hello Chris, thanks for your comment. I’m happy to hear that you found my guide helpful and that you came back safely.
Also thanks for the update on the present condition of the Slide. Apparently it has deteriorated the past 2 years. I will put up an update on this post as a warning.
I’m a 77 year old guy who just did the Papago Wall and Slide on the 20th of October 2025 and found it reasonable, with proper caution. I wouldn’t hesitate to do it again.
The information from the Overseashiker web page was useful. I saved it as a pdf on my phone and carried a printed copy. I spent 5 minutes at the top of the Slide carefully studying and precisely memorizing my route. You must go left at the very top into the large rockfall from October 2024. I kept my poles in my pack and often used all fours to cross uneventfully, before pulling out the poles. For the entire Slide I used the Tripod Method of always having 3 secure points of contact before moving the 4th limb. I never made a move until the tripod was secure, and I did not slip much at all. I was down in 19 minutes staying cautious the entire way.
The Papago Wall and especially the Slide look intimidating but focusing on staying on route and precisely placing your limbs helps keep anxiety at bay. Many hikers have done this section and if you feel confident about doing the Escalante Route you can, with proper respect, caution, and determined focus handle this.
Thank you, Art for you reply and advice on the Tripod Method!
Any thoughts or information on going through this area in the upstream direction please?
Hello George,
I think there are 2 disadvantages for going upstream:
1. The Papago Slide and Wall are more difficult to ascend than to descend.
2. The Tanner trail is very long with no water source, and very difficult to hike up in one day.
I would definitely recommend starting at Tanner and going downstream.
What is the reason you would consider upstream?
Hi George–
I just completed a hike down South Kaibab to the Tip-Off, then east along the Tonto Trail, further east along the Escalante Route, then up the Tanner Trail. For me, going in this direction worked out an absolute treat and I would highly recommend it for people confident in their abilities.
Going up the slide and down the wall proved very doable for me and my hiking partners. Personally, I much prefer going up loose talus than down it. For me it simply feels safer this way.
Spending the first 3 nights of our hike along the Tonto shelf before finally reaching the river on day 4 was highly satisfying. Spending 2 nights sleeping next to the Colorado at the tail end of the trip felt like a wonderful crescendo. And making it up and out the Tanner Trail on our last day was no issue. Again, though, whether or not the “upstream” version of this trip is advisable depends very much on your own abilities. Good luck!
Thanks, a good idea to hike the other way when I would do this trail again!
i am heading out there at the end of april- thanks for the details! i’ll check back in when i am back!
Hello Ren, I’ll be at the Canyon as well, April 26-28. I’ll be hiking the Hermit Trail with my 4 children.
Hi Paul, a friend and I plan to do this route 02/03/2025. Thank you for the great information. Hopefully we’ll get more information if someone goes before that date. If I remember to do it I’ll send an update when we get out around the 9th. Doing the Tanner Trail to Bright Angel Trail.
Happy Holidays, Pete Murphy
Hi there Peter. Did you end up doing the Escalante route on 2/3? Curious of your experience at the slide. Hope you had a great trip!
Does anyone know how the slide has changed since the October 2024 rockslide? I just got a notice about the instability of the slide from the Park Service because I have a March 2025 permit for the Escalante Route. I went through it before and found that it was much easier than pre-trip anxiety made it. Now I’m growing anxious again.
Hello Paul, from what I’ve read online (on Reddit mostly), the basics are the same: first make the traverse to the opposite side, then down towards the chimney.
A recent photo (via reddit) shows that the ‘white slab’ on the traverse is still there, the ‘trail’ towards the ‘firepit’ is the same, only with some more loose gravel. The ‘half moon’ rock is partly covered.
From what I understand the Slide is now just a bit more difficult, but still doable.
Beware of falling rocks at all times: go one by one with enough distance, or go all together when descending in a group.
Thank you. We’ll proceed with a little more caution, but without an excess of worry. Since the park service emailed everyone with an Escalante Route permit, I’m sure there will be more folks heading to your page. It’s a great resource, and I appreciate it.
Thanks, and have a good trip! Please let me know your experiences at the slide.
I went down(river) through the slide solo on 12/29 and this guide is still solid. I got to the Chimney with no issue by generally following the white line and the landmarks were mostly visible.
My only trouble was that I didn’t continue to follow the white line beyond the chimney which would hug the rock wall on the left (South) side. I followed social tracks/erosion to the right wall and that was definitely NOT correct. I surfed down the talus on a combination of feet and rear.
Thanks Tyler for your comment and update!
Glad you made it down safely.
I did this a long time ago and would have loved to have this description, we found the wall to be a paper tiger, but we didn’t have your instructions and one of our girls almost freaked out on the slide. After we got the girl calmed down we went straight down from your “go left” marker which we obviously survived. The last bit going down the chimney was just sort of a controlled slide. For anyone who hasn’t done this. This description of how to do the slide is excellent. For hikers the slide is fairly daunting.
Thanks Clyde for your comment.
Thank you so much for the detailed descriptions of this trail. I am doing the this October 11-14th with the TSX challenge and I was so worried about the this part of the hike. After reading this I feel more confident!! Now I need to get over the fear of the snakes and scorpions. LOL
Hello Christine,
thanks for your comment. I hope you have a great time! As long as you don’t reach underneath rocks and shrubs you will probably not encounter any snake or scorpion.
Loved reading through this! Reminded me of my Escalante Route trip back in October 2023. I recognize that white rock on the slide. One of our waypoints too!
Nice to hear that, thanks.
This guide was an absolute lifesaver, thank you! I also found the wall itself to be relatively trivial, but I think it might be worth adding that as you come around the corner to the top of the Slide don’t worry that it initially looks like a 300 foot plunge to the river below because once you get oriented you will be able to see the route. Thank you so much for this level of detail.
Hello Micah, thanks for the kind words and your addition!
Pieter, I’ll throw another accolade your way as well. This is great information. I leave with a party of 3 others this coming Monday for our 5 day 4 night hike of the Escalante Route and am so excited. Your report has increased my chances of a success. As to the wall and Slide, I am a climber and doubt that would bother me too much. Some of the trail exposure along the route has gained more of my attention than those two obstacles. Thanks again. Tom
Hello Tom, thank you so much. It’s exciting to hear you’ll be on the trail in a few days!
Since you’re a climber, the Wall and Slide will indeed pose no difficulties for you. The exposure along the route is not extreme. Just take care a certain parts, especially climbing out of the canyon towards the Horseshoe Mesa. Have fun and enjoy the hike!
Thank you so much Pieter!! Some other reviews of the Escalante trail got my hands sweaty for this section but your detailed description & photos made me breeze right through. An amazing resource to get some confidence to go out there and do it.
For anyone doing the route: bring these screenshots with you on the trail 🙂
Thanks Lisa, I’m happy to hear that my post was helpful. Great that you’ve made it to this amazing place.
Pieter- You are absolutely right, detailed information on the Papago wall and slide is hard to find but then I found your post! Thank you for the well written description of both the wall and the slide. My adult daughter and I are backpacking the Escalante Route in mid-October 2023. We’re both very excited about the trip.
Hello Tom, thanks, I’m really happy my blog is helpful. Must be great to go on this hike with your daughter, have fun and enjoy the canyon!
Best description I’ve seen to date. Thank you!
Thanks!
Pieter, you have the best description of Papago wall/slide! More I looked at videos more intimidating it looked. Escalante route it’s been on my list for a while after I did rim to rim, Boucher and Hermit trails.
You need to come back and do JMT! I live in CA so logistics for my SOBO and NOBO were very easy. This year will be very challenging due to big snow.
Happy trails!
Elena
Hello Elena, Thanks! I was intimidated as well, but in the end I think the Escalante Route was not too difficult. So I hope this will help you.
I really hope to come back to California and hike the JMT one day.