The Escalante Route is celebrated as both the toughest and most beautiful trail in the Grand Canyon. I hiked this route in November 2022 and I was amazed by the spectaculair views of the Canyon and Colorado river I didn’t even know existed. Do you want to hike the Escalante Route? Read on for everything you need to know about this adventure.
Escalante Route Overview
Start: Lipan Point, Tanner Trail Trailhead (7,350 ft / 2.240 m)
End: Grandview Point (7,400 ft /2.256 m)
Trails: Tanner Trail, Escalante Route, Tonto Trail, Grandview Trail
Total distance: 31.3 miles (50,4 km)
Elevation gain: 7,425 ft (2.263 m)
Elevation loss: 7,608 ft (2.319 m)
Lowest point: Hance Rapids 2,536 ft (773 m)Total hiking time: 5 days (19:30 hrs)
Hiked: November 11–15, 2023

Overview of the Escalante Route as I hiked it in 5 days, November 2022
= = Update feb. 2026 = =
In October 2024 there has been a rockslide on the Papago Slide, a difficult part of this trail . The present situation at Papago is different than described on this blog in 2022. My description of the Papago section is still valid (read my Guide to the Wall and Slide), but especially at the top, as you traverse under the wall, the rocks can be unstable. Please read the more recent comments below that post, before deciding to hike the Escalante Route. Be careful!
What is the Escalante Route?
The Escalante Route is a 12 mile (18,2 km) wilderness trail at the bottom of the Eastern Grand Canyon. The trail is accessible only through the Tanner Trail and the Tonto/Grandview Trail (or, alternatively, the New Hance Trail), resulting in a ± 30 miles (50 km) hike. The entire trail is commonly hiked from east to west, because the Wall and Slide section at Papago Beach is almost impassible in the opposite direction.
The Escalante Trail offers a unique opportunity to experience the Grand Canyon from the canyon floor, hiking close to the Colorado River and camping on its sandy beaches. For a more detailed description of each section of the trail, see my reports of the 5 days on the trail. Below I will focus on planning and preparation for this hike.
How Difficult is the Escalante Route?
The trail is so rough that it officially is called a ‘route’. This means that the trail is not maintained, there is no official signage and sometimes the trail is hardly visible – or non existent. At several passages you will use both hands and toes to proceed and there is serious exposure at short sections. Following the SAC Alpine Hiking Grade Scale the trail varies from T1 (easy hiking) at the Cardenas Beach section to T3 (difficult mountain hiking) at the Papago Wall and Slide.
For this trail some hikers advise to double your usual hiking time per mile. My personal experience was less extreme: I would say I hiked about 20% slower than on the Haute Route and about the same speed as on the Forester Pass section of the John Muir Trail, to give a reference point. The entire trail is usually hiked in a moderate tempo of 5 days, although I have met well trained canyon hikers doing it in 3 days.
Above all this, water sources are limited to one point per day (if you plan wisely) and temperatures can be extreme (hot or cold). No surprise that this hike is advised for experienced Canyon hikers only.

Scrambling up the infamous Papago Wall halfway the Escalante Route requires hands and feet as well as stamina.
Having expressed all these warnings, I must admit that to me the hike was not more intimidating than hikes I did in the Swiss and French Alps. I think the most difficult parts of this hike can compare with the hardest parts of the Swiss Haute Route. The major difference on the Escalante Route though is that you will probably be entirely alone most of the time. In case of an emergency, rescue is not guaranteed or at least it could take a lot of time.
All in all, the Escalante Route is challenging, wild, spectacular, lonely, silent and above all: a wonderful experience.
When to hike the Escalante Route?
The Grand Canyon is best hiked in autumn (October–November) or spring (March–May). Summer is too hot, when normal temperatures on the canyon floor are 106 F (41 Celcius) in the shadow. Summer temperatures will limit your hiking to early morning and late afternoon. I would certainly not try to do this hike in summer.
Winter is generally too cold, with freezing temperatures even on the canyon floor.
Autumn and spring offer the best opportunities with relatively moderate temperatures and less crowds (although the Escalante Route, being so challenging, will never be really crowded).
Maps, Trail Guides and GPS
The blue Grand Canyon National Park map by Sky Terrain Trail Maps is an absolute must if you want to get some overview of the trail. For route finding the map is, in my opinion, not detailed enough with its 1:40,000 scale, although it is a little better than the NatGeo map (1:50,000). The Sky Terrain map shows all the trails and the Escalante Route with distances in miles and a grading (Easy, Moderate, Difficult and Expert) for all sections of the trail. The map is drawn in a beautiful shaded relief which gives some sense of the different elevations.

Sky Terrain map with my trail notes
The map is much larger than what you’ll need on the trail, so I cut off the northern part of the map. This made the map much easier to handle in the field.
Trail Guide
There is no guide book for the Escalante Route that I know of. To prepare for the Tanner Trail, Tonto Trail and Grandview Trail I used the Falcon Guides Hiking Grand Canyon National Park by Ron Adkinson. This guide gives a detailed account of the mentioned trails, as well as a lot of other trails in the Canyon. The Escalante Route is not included in the book, probably because it not an official trail.
GPS Route Finding
For precise navigating in the field, the Sky Terrain map is drawn to a scale far too large, so I used a GPS-app. This has prevented me from hiking in the wrong direction at least once a day, saving me time and avoiding possible hazardous situations. I used the Gaia app, but there are many others available like Outdooractive or Alltrails. Whichever one you choose, the most important thing is to download the map layers to your phone while you still have an internet connection – something you will not find in the canyon. You can also download GPX-tracks when planning the hike, but this is not strictly necessary when the trails are drawn into the map layer. Feel free to use my Escalante Route GPX-tracks.
Grand Canyon Backcountry Permits
For all overnight trips in the Grand Canyon, a permit is required. On the National Parks website you will find all information on how and when to apply. In general you can apply for a permit 5 months in advance. The most popular hikes on the so called corridor trails are hard to get, even in the off-season. For the Escalante Route the permits are somewhat easier to get. When I applied at the beginning of September, I received my permit within 3 days through email.
When filling out the Backcountry Permit Request Form you are supposed to name each area where you camp plus their corresponding Use Area. This is a 3-digit code, for example BB9 for Tanner Beach. All codes are indicated on the Sky Terrain map and can also be found on the NPS website. Make sure to check these codes carefully before sending the form.

My Grand Canyon Backcountry Permit
Getting to the Tanner Trailhead
The closest international airport to the Grand Canyon is Las Vegas. From there it is at least 5 hours driving to Grand Canyon Village at the South Rim. Note: it is virtually impossible to reach the canyon and the trailheads without a (rental) car. Public transport will probably take about 12 hours of bus rides. Moreover, there is no way to reach the trailheads by shuttle or taxi, as they are too far from the village.
Once you arrive at Grand Canyon Village, don’t be fooled by the flatness of the south rim: you are still at an elevation comparable with many mountain huts in the Alps. The village sits at ± 3,280 ft (2.200 m) elevation and for those living at low elevations, it is only common sense to stay at least one day and night in the village to acclimatize . I stayed two nights absorbing the scenery before I hiked down.

Just below the Tanner Trailhead, a snow covered trail plunges deep into the canyon.
The Tanner Trail begins at Lipan Point (23 miles east of the village) and the entire hike ends at Grandview Point (12.5 miles east of the village). The distance between start and end point makes a ride between them a must, either at the start or at the beginning of the hike. Some (mostly US residents) will use two cars, leaving one at Grandview and then drive to Lipan Point. Most hikers however, especially European, will not have two cars at hand and will need to hitch a ride between the two trailheads. Probably the most comfortable strategy is leaving your car at Grandview (there is a separate parking section for overnight hiker parking) and then ask other visitors for a ride to Lipan Point.
When I arrived at Grandview and parked my car, even at 7:15 a.m. there were many visitors admiring the sunrise. My experience was that most visitors were willing to help and within 5 minutes someone offered me a ride to Lipan Point. It is important though to approach people personally (a cardboard sign will not work) and ask specifically if they go east, as not everyone knows what Lipan Point is.
Gear for the Escalante Route
Hiking the Escalante Route requires the same gear as any thru hike in general. But special attention is required for typical Canyon necessities. Below I will point out some of the things you need to know about water, snow safety, food protection, tent and clothing. See my detailed post for the Escalante Route Gear List.
Water Filter and Bucket
The most important item in your pack for a Grand Canyon hike is water. If water is not the heaviest item in your pack, you have packed wrong. Especially in summer, but still important when the Escalante Route is hiked in autumn or spring. The general rule of thumb is to carry about three quarts (3 liters) per person per day. Hiking in november, I drank about 2 liters until I reached the next water source. Since I want to have some extra in case of emergency, I carried about 3 liters.
The main water source during this hike is the Colorado river, plus the source at Hance Creek on day 4. The river water can be full of silt, which will clog your water filter quickly. Therefore it is necessary to bring a (collapsible) bucket to let the water settle for a couple of hours before carefully scooping the clear water out of the bucket into you filter system. If the water is very silty (mostly in spring), it may help to add a pinch of alum in the water, stir vigorously and wait for 2 or 3 hours. After settling, filtering the water is still important, because the Colorado River carries bacteria and viruses.

Snow Safety
The trailheads sit at an elevation of ± 7,350 ft / 2.250 m which means chances are there is a pack of snow in early spring and late autumn. When I hiked the trails in November, there had just been a snowstorm the morning before I took off for the Tanner Trail. Therefore I was quite happy that I brought the microspikes I bought especially for this trip. Even though I only used them for the first and last 30 minutes of the 5 days on the trail, I think they were essential for my safety. The last 30 minutes of ascend on the Grandview Trail in particular would have been seriously hazardous without the microspikes. So add these 4 ounces of weight to your pack, you will not be sorry.
Food Protection
The Grand Canyon (and Tanner Beach in particular) can sometimes be plagued by rats, mice, squirrels and ravens. These animals have gotten used to people leaving food unattended and they await their chance to grab it. A lot of hikers report the animals even chew through their backpacks while they’re empty. Safe storage of food (and other scented stuff) is essential. There are two options: hanging all the food from the low willow trees and hoping it’s still there in the morning, or bring a decent food container. I chose the latter method and brought my bear canister. A so called rat sack would also have been possible, but I didn’t want to buy yet another expensive piece of gear. An advantage of the bear canister over a rat sack is that the food and toiletries stay clean. In a rat sack sand will get into your carefully selected food through the steel wire mesh. My 10 liter Bearikade Weekender added another 2 pounds (930 gr) to my pack, but it was worth it, not a crumb of my food was stolen by animals.

My bear canister during a break on the Tanner Trail.
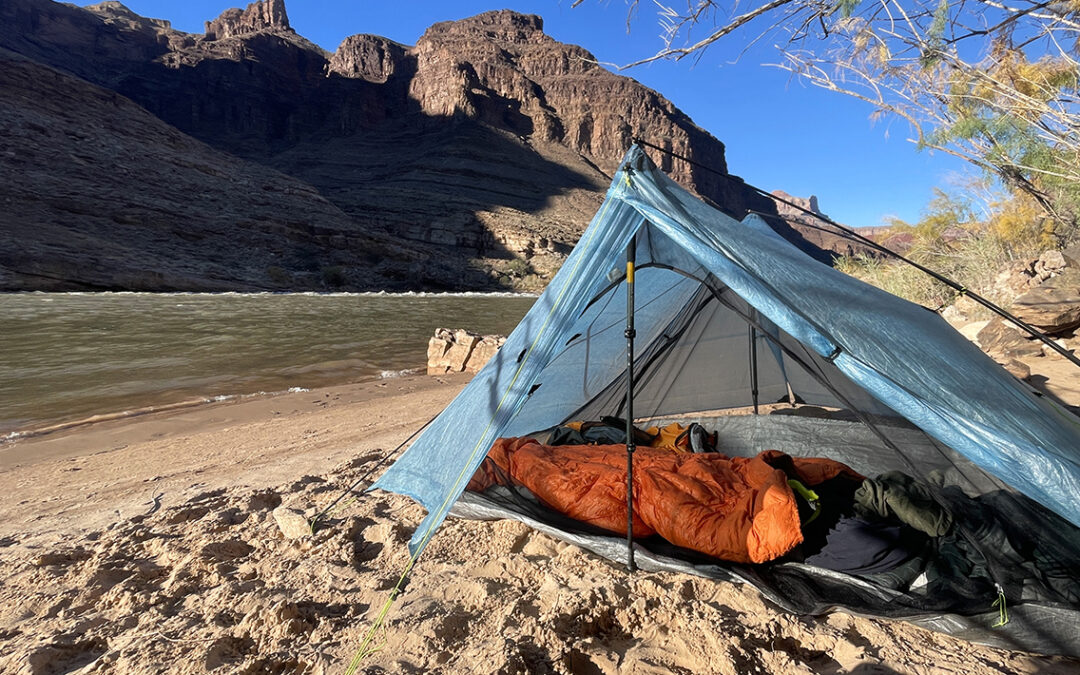
Tents and Stakes
I carry a Zpacks Duplex tent that needs 6 to 8 stakes to set it up. This poses a problem at the Grand Canyon, as the ground is either impenetrably hard or, at the beaches, too soft to hold a stake. For this reason I ordered a Freestanding Flex Kit from Zpacks, which transforms the Duplex into, yes, a freestanding tent. This was a cheaper option than buying a new lightweight tent, but it added 10 ounces (290 gr) to my pack.

Clothing for the Escalante Route
Wether you’re hiking in autumn or spring: prepare for long, cold nights. Be aware that the night falls quite early (check exact sunset and sunrise before you plan your hike). As soon as the sun disappears behind the high canyon walls (around 3 p.m. in November), the temperature will drop quickly. Although I hiked in only a thin shirt on the canyon floor, in the evening and night I wore 4 layers of insulating clothing inside my sleeping bag. Also prepare for rain and snow, so bring rain gear, warm hat, gloves and buff.

Sunrise at Escalante Beach, halfway the Escalante Route with Apollo Temple flaming red in the morning sun.
My Escalante Route Iterinary
Hiking the Escalante Route in November, I planned for short days (less than 10 hours of daylight!) at a modest pace. I wanted to be able to enjoy the Grand Canyon as long as possible and leave enough time to do the difficult parts without rushing. So I planned to hike 5 days, with a very short third day for the more difficult scrambling parts of the route at 75 Mile Canyon and the Papago Wall and Slide.
Below is my 5 day itinerary with average distances and hiking times (moving time without breaks).
- Lipan Point to Tanner Beach on the Tanner Trail, 7.8 miles (12,5 km), 4:30 hours
- Tanner Beach to Escalante Beach on the Escalante Route, 9 miles (14,5 km), 5 hours
- Escalante Beach to Hance Rapids on the Escalante Route, 3.7 miles (5,9 km), 3 hours
- Hance Rapids to Hance Creek on the Tonto Trail, 6 miles (9,8 km), 4 hours
- Hance Creek to Grandview Point on the Tonto Trail and Grandview Trail, 4.9 miles (7,8 km), 4 hours
Fast hikers will usually combine day 2+ 3 and 4 + 5 and hike a total of 3 days. In the next posts I will describe each section in more detail. If you have any questions about this trail, do not hesitate to comment below.
Hello Pieter. A bit of a noob question. When you finish day 5 at Grandview, how do you get back to Lipan Point assuming you parked your rental car there? Walk on road? Or is there a better way to go about it
Hello Bradley, thanks for your question. This is not a noob question, but a serious problem for solo hikers.
There is unfortunately no bus or taxi service between the two trailheads. A walk would take another day, it’s about 12 miles! So the only option is hitch-hiking.
I would advise to have your car at the end – at Grandview, because you do not want extra hassle at the end of the trail. So it’s better to park your car at the Grandview hikers parking and then get a ride to Lipan Point. Read Escalante Route, Grand Canyon – Day 1 for more on information on that strategie.
Have a good hike!
Great description of the route and very informative. We did it with 4 adults and 4 teenagers 13-15 years old 2 years ago. It was tough and amazing. We came the other direction, I have to say that I think the Papago slide is probably easier going up than down. We did the wall with lowering backpacks with a rope, just to be safe. Without a pack climbing down was no problem. We are planning to do this route again in May, in the standard direction – Tanner is definitely more beautiful that way. We did stay half way up on Tanner and coming down on Grandview Mesa – the campsite on Tanner after the red wall (if you come up)/before the red wall (when you go down) must be one of the most beautiful in the world – but we also pre-stashed water to do so, since this was the uphill part.
Thanks, great to hear you did the hike with kids!
Hello Pieter,
Thank you so much for sharing this detailed itinerary and your experiences on the trails! I am planning this trip for end of April, pending permits. I’ve found this extremely helpful.
Dan
Thanks Dan, good to read that my report is helpful. Have a great hike!
Hi Pieter!
I did the same route last October and your article was very important for our planning. I’d say it’s the best guide to the Escalante out there. Thank you so much for sharing your experience and putting together all this relevant information! By the way, I wonder how you managed to build a so comprehensive guide to the Papago Wall and Slide on your very first attempt of the route. Great job!
For the other interested in this route, don’t underestimate food protection! We had a nightmare night at Cardenas Beach. The rat infestation there is insane.
Looking forward to next opportunity to come back to the Grand Canyon!
Hello Angelo,
Thanks for your kind words. I am happy to hear my information is helping other hikers to do this trip safely.
I have prepared myself for the route by reading a lot of blogs and watching many video’s, but, as I wrote, none of them seemed to be completely accurate. So I had to find out myself while on the trail!
I was lucky that I didn’t see rats, but I am glad I carried a bear canister!
Nicely written and a very enjoyable read. Have done this route three times and going again in the first week of October with my niece. One of my favorite GC hikes. I’ve used alum in the past to settle CO river water but it is slow. Using the P&G Purifier packets on this upcoming trip. Have done New Hance to South Kaibab years back after getting some good water reports, but we filtered whenever we saw any water as it was scarce.
Hello Tim, Thanks for your comment and have fun when you go into the canyon again!
I must concur with other reviews. This is a truly excellent summary and description of the trail. Having done this route twice, I still find this information to be extremely helpful (and accurate). Hikers should save these pages on their phones or carry printed copies! Thank you for all of your work on this. For those who prefer to have guaranteed transportation between Grandview and Lipan, I would highly recommend “clothing of the gods”. Check the “Grand Canyon National Park Transportation and Activity Directory”.
Thank you, Tim! Happy to help other hikers.
Hello Pieter,
My Name is Claudia I lived in Arizona.
I am looking for Escalante Route and found this.
Thanks for your explanation. It is wonderful.
Someday I will try this Escalante Trail.
Thank you!!!
Hi Claudia,
Thanks for your comment, I hope you will hike this route someday!
Thank you very much for posting this description of your hike along the Escalante Route. I’m planning on doing the same hike this November, but continuing on the Tonto westbound to Bright Angel and ascending to the South Rim there. I really appreciated the detailed information you provided, and of course the photos are beautiful. Happy trails!
Hello Mike, thanks! Great that you’ll continue westbound. That was my initial plan as well, but I found the water situation between Horseshoe Mesa and the North Kaibab Trail junction somewhat problematic. But I have talked to hikers who have done it, so it is definitely doable. Have fun!
Best description I’ve seen yet of this route. Planning to do this with my wife in November. Have done 5 days before in canyon: Grandview to Bright Angel. There’s always water in Grapevine. Love your Papago wall and slide section detail, doesn’t look as bad as most people make it out to be. Looking forward to it! Anyway, great job!
Thanks for your great route description. Three of us finished this two days ago, and your trip report was very helpful in planning our trip. What a fantastic route this is!
Thanks, it’s good to hear my posts were helpful!